Controllable characters are the backbone of most games. This article will explain how to create and build out a new playable character in Unreal Engine. By the end, you should have a solid understanding of how characters work and the background to strike out on your own.
And FYI, this article was written while using Unreal Engine 5.7.
- Prerequisites
- Goals
- Step 1 – Character Blueprint Initial Setup
- Step 2 – Using the Character / Game Modes
- Step 3 – Handling Inputs
- Step 4 – Locomotion Component & Player Controller
- The Player Controller – Initial Setup
- AC_Locomotion – Initial Setup
- Player Controller – Adding Input Actions
- Player Controller – Talking to Other Blueprints
- A Quick Explanation of Triggered vs Started
- AC_Locomotion – Making Our Character Move
- A Quick Explanation of Movement
- AC_Locomotion – Connecting the Rest of the Movement Features
- CBP_Base – Enable Crouch and Camera Movement Settings
- Step 5 – Character Animations
Prerequisites
You should have a basic understanding of the Unreal Editor interface and general concepts like blueprints. This assumes you are just familiar enough with UE to understand basic terms and find your way around.
You will also need a humanoid skeletal mesh and animations. Simply adding the official Third Person Content Pack to your project will give you everything you need for this first part.
Goals
This post will cover creating a controllable character in Unreal Engine. The character will be able to walk, run, crouch, and jump. We will also discuss topics that make up the immediate system architecture that surrounds playable characters. This includes topics like…
- Game Modes
- Player Controllers
- Actor Components
- Animation Blueprints
Step 1 – Character Blueprint Initial Setup
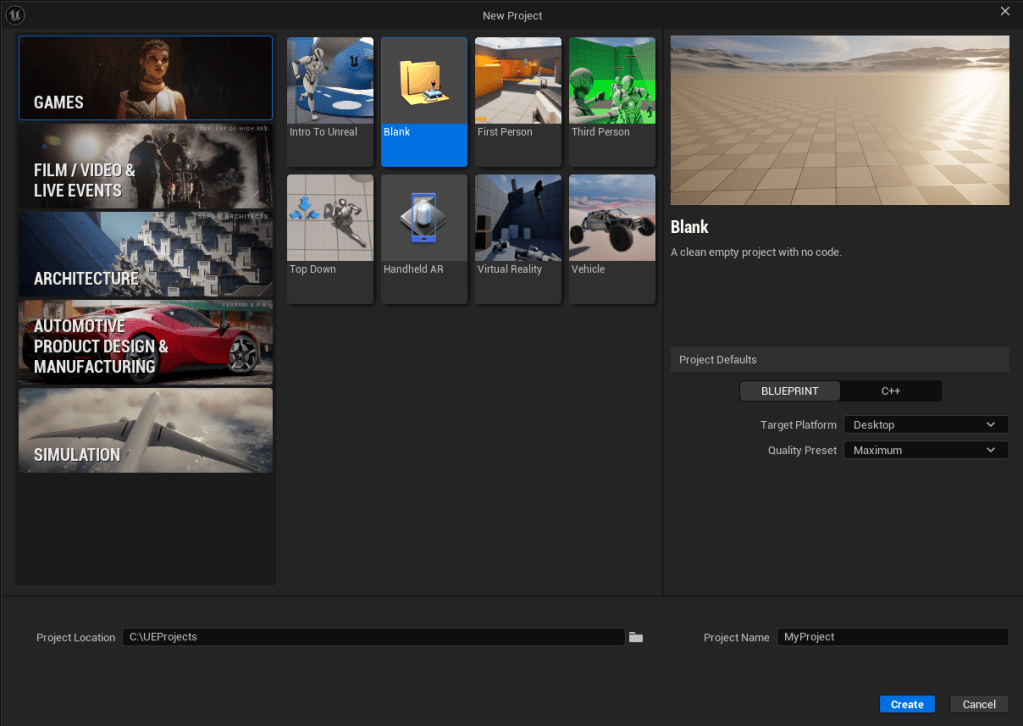
Let’s start by creating a new Blank project in Unreal Engine.
Click File -> New Level and choose “Basic”
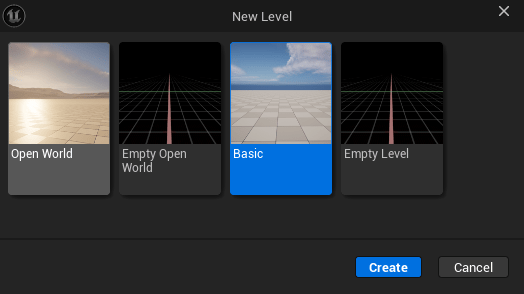
Save this new level to Content/MyGame/Maps/L_Testing
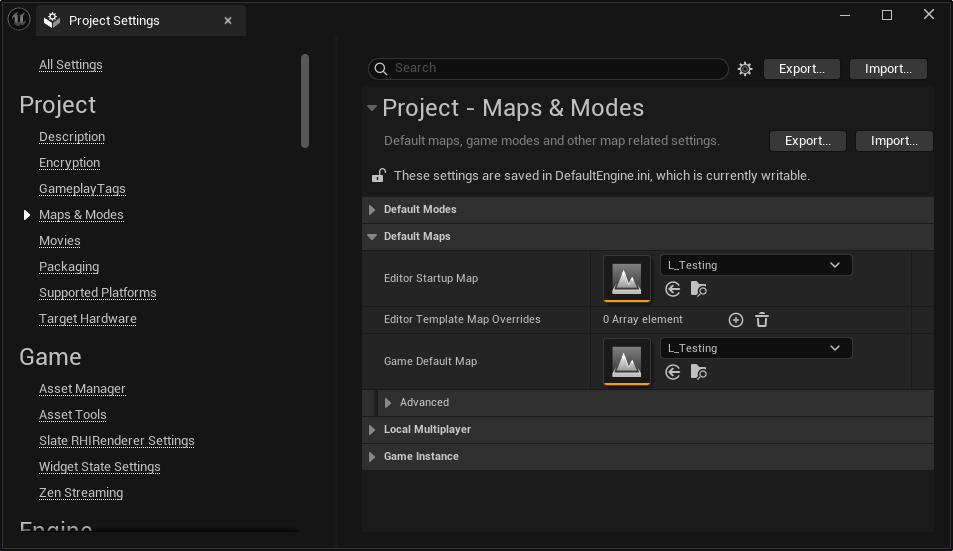
Since this is going to be a really big tutorial, let’s also set this as our project’s default map under Project Settings -> Maps & Modes
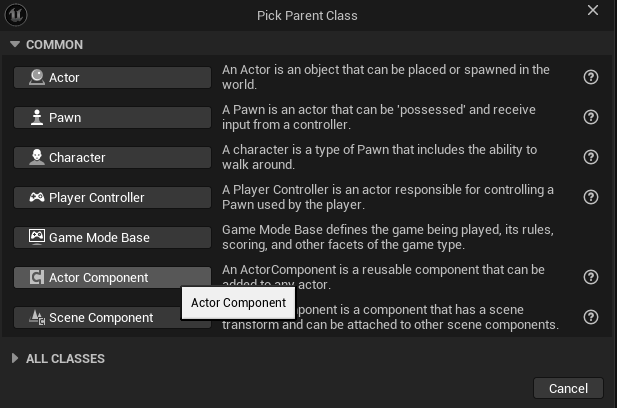
Next, create the folder Content/MyGame/Characters and inside that folder, create a new Blueprint Class of type Character and name it CBP_Base (CBP means “Character Blueprint”).
We call it “Base” because we may want to use it to create child classes in the future for different playable characters, and “Base” reminds us that we can use this specific blueprint that way in the future.
Important Definitions
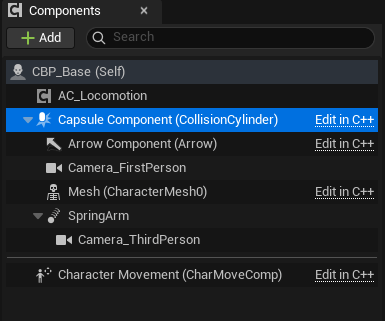
Character blueprints include a few components out-of-the-box:
- Capsule
- Arrow
- Mesh
- Character Movement Component
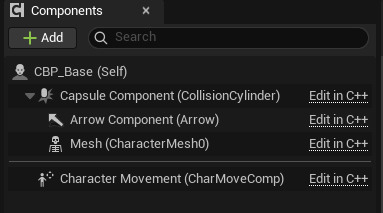
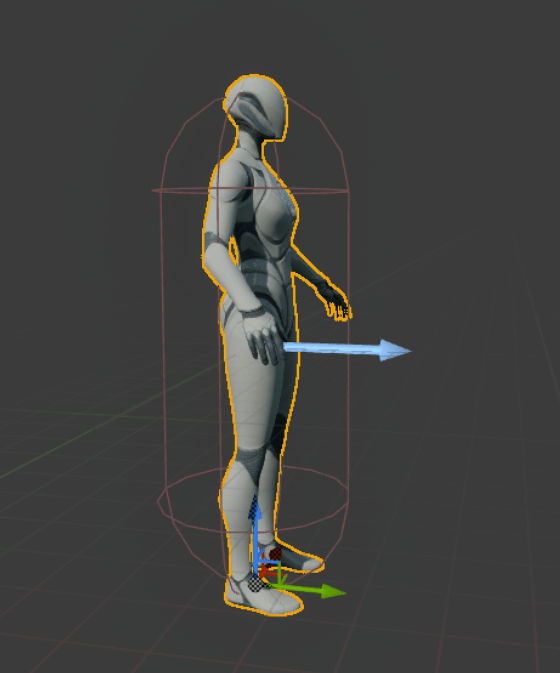
The Capsule is, for all intents and purposes, your actual character in the world.
The Arrow Component is a convenient “widget” just for you, the developer, so you know which direction is “forward” for your character.
The Mesh is a skeletal mesh that depicts your character for the player. You will use an Animation Blueprint to bring this skeletal mesh to life, creating an illusion for the player that they are controlling this character and not just an invisible capsule.
The Character Movement Component (aka CMC) is a component that, when attached, provides the functionality to move the capsule around a level.
Create the Character Blueprint
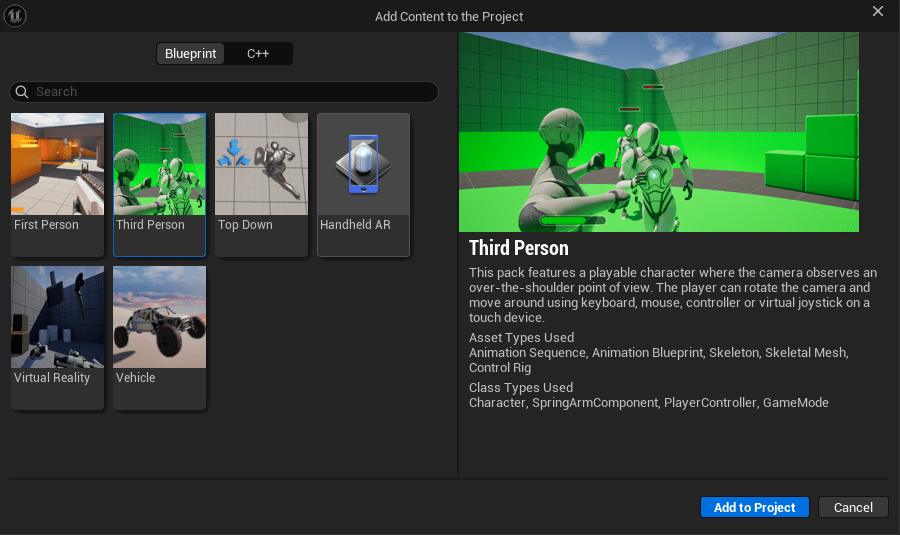
We still need animations and a skeletal mesh to represent our character, so let’s load a content pack.
Open the Content Drawer, then click “Add” at the top of the drawer.

Click “Add Feature of Content Pack…”
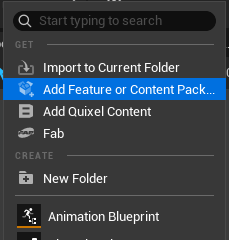
Select the “Third Person” content and then click “Add to Project”
Now, let’s add an initial mesh.
Select the “Mesh” component in the top left, then in the Details panel on the right, find “Skeletal Mesh Asset”. Click in that and search for “SKM_Quinn_Simple” and select it.
This will attach the selected skeletal mesh (SKM) to your Mesh Component. But it’s not quite right. By default, it’s turned 90 degrees the wrong way and is floating in the middle of the capsule instead of standing in the bottom. This is easy to fix!
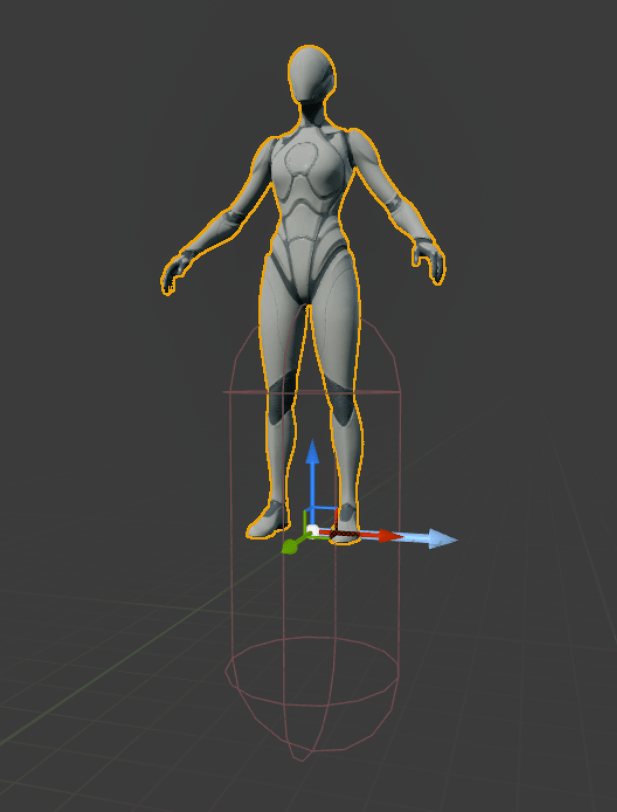
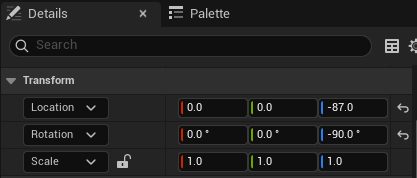
With the Mesh component still selected, you just need to make the two adjustments to the Mesh’s transforms…
- Set Location Z axis (blue) to -87.0 to lower it by 87 cm.
- Set Rotation Z axis to -90.0 to ensure it’s facing the same way as the arrow.
Before we move on, let’s tweak one more thing just to help us out while we’re working on our character… let’s make the Capsule visible in-game.
First, select the Capsule in your components panel (far left)…
In your Details panel (far right) search for “hidden” and UN-check “Hidden in Game”.
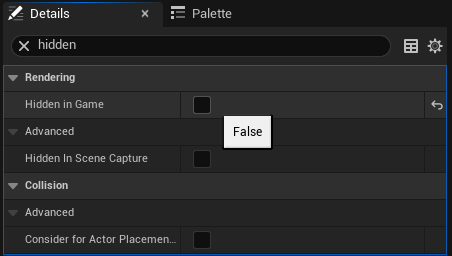
Now, when you play in editor (PIE) you will see the capsule as well. This is helpful because the capsule changes sizes when you do things like crouch.
💡Don’t forget to hit Compile + Save All regularly. Now is a good time to do it!
Adding Cameras
Next, we need to add a few more components. I like my games to support both third person AND first person cameras, so we’ll set that up now.
Adding a First-Person Camera
Let’s start by adding a First Person Camera. In your Components panel (upper left) click “Add” and search for “Camera”.
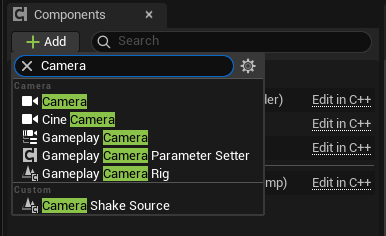
Choose the first option, which is just named “Camera”
Let’s name this camera “Camera_FirstPerson” so that we can easily tell it apart from the additional camera we’re adding later.
The camera is currently positioned inside our character’s ass, which isn’t ideal. Let’s move it up and forward so that it’s roughly inside our characters head.
The image below sets the camera Location to X:15.0, Y:0.0, Z:80.0
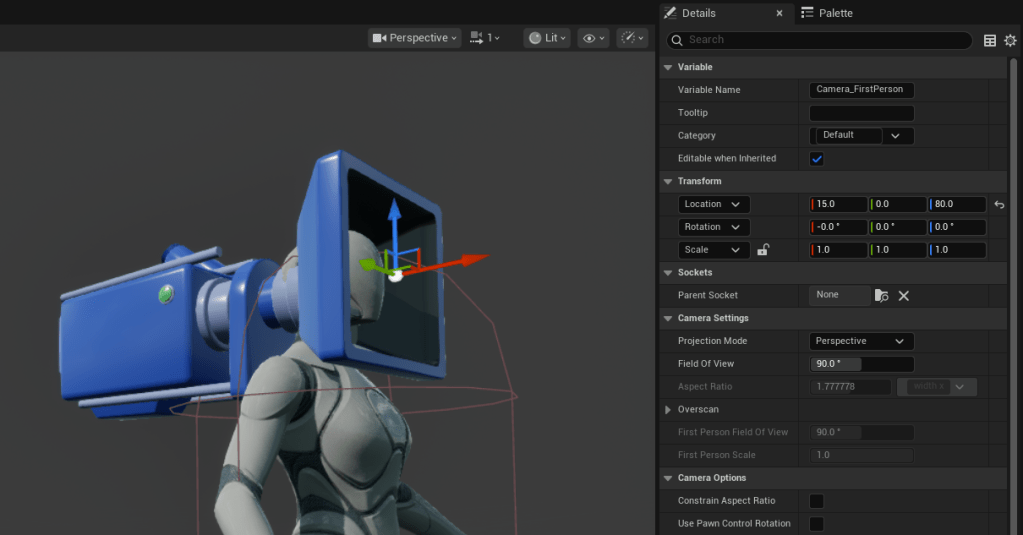
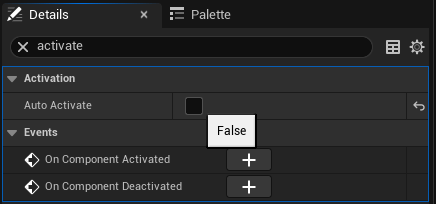
Now time to make a choice. Do you want your default camera view to be first person or third person? If you want the default to be third person (which we’re doing next), find the camera’s “Auto Activate” setting and UNCHECK it now.
If you want to have first person be your default, then you don’t need to do this now, but you’ll do it with the third person camera, next.
Adding a Third-Person Camera
Third-person cameras typically take two components. Instead of just being a Camera, you add a “Spring Arm” component first, then attach your camera to that. This lets you control the camera better by manipulating the spring arm!
So with the Capsule component selected, click “Add” and then search for “Spring Arm” and add it.
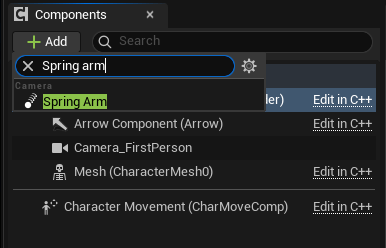
Now, select the SpringArm component you just added and then click “Add” again. Now, search for “Camera” and add a Camera under your SpringArm. Name this camera “Camera_ThirdPerson” to distinguish it from the first one.
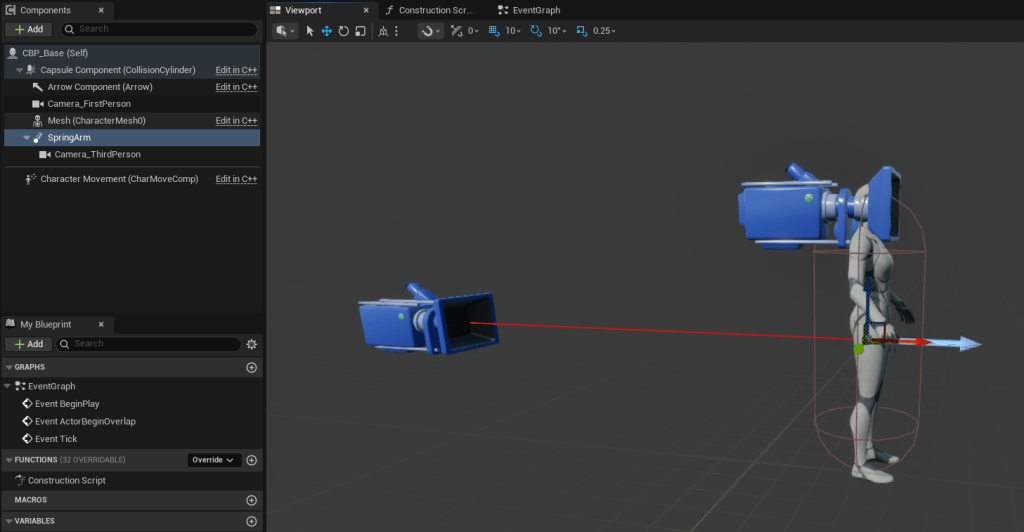
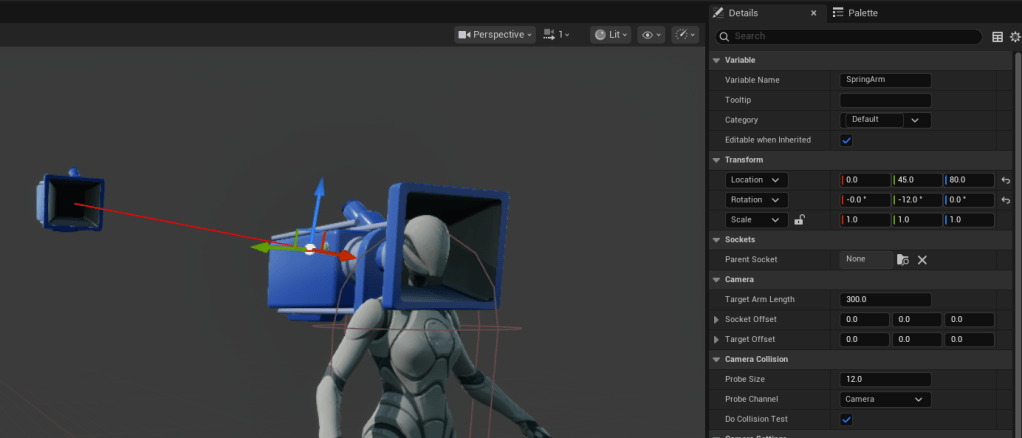
Once again, the camera is looking at our character’s ass. To fix this, we just need to move the SpringArm so it’s about head level and tilted a bit and offset a bit so that our character isn’t blocking our view.
The image below sets the camera as follows:
- Location to X:0.0, Y:45.0, Z:80.0 (
- Y is a bit to the right, and Z is head-level
- Rotation to X:0.0, Y:-12.0, Z:0.0
- -12 rotates the spring arm slightly for a higher-angle
Finally, we need to follow up on the “default camera” decision from a little bit ago. Only one camera should be set to auto-activate.
If you want your default camera to be first person, find the third person camera’s (which you just created) “Auto Activate” setting and UNCHECK it now.
Remember, you only want ONE of these cameras to have this option checked… so make sure the one you want as default is checked and the other one is UN-checked! We can control this from blueprint code later, but it’s good to keep these things in mind now so you don’t get confused while testing.
💡Don’t forget to hit Compile + Save All regularly. Now is a good time to do it!
Step 2 – Using the Character / Game Modes
If we try to play in our level, we won’t be using our new character yet. So how do we get the character into the level the right way?
For this, Unreal Engine has Game Modes.
Game Modes are a special blueprint type that can be attached to levels, while other important blueprint types (like your playable character) are then attached to the Game Mode.
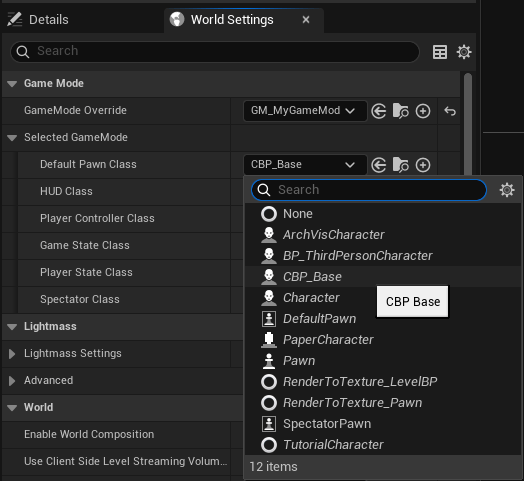
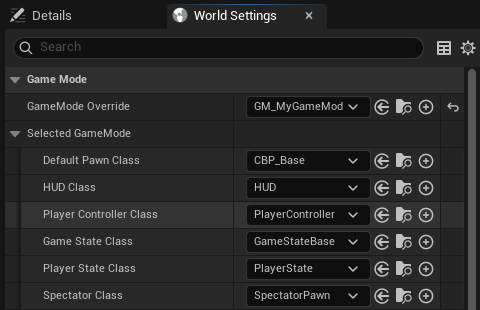
Open up your Content Drawer again under Content/MyGame/ create a new Blueprint of type “Game Mode Base”
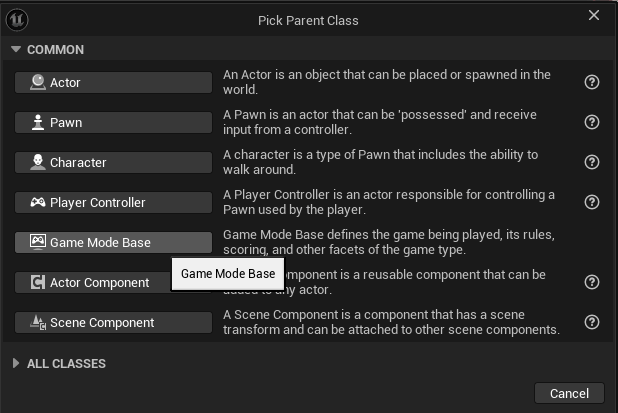
Call this new blueprint GM_MyGameMode (or whatever you want, just remember it).
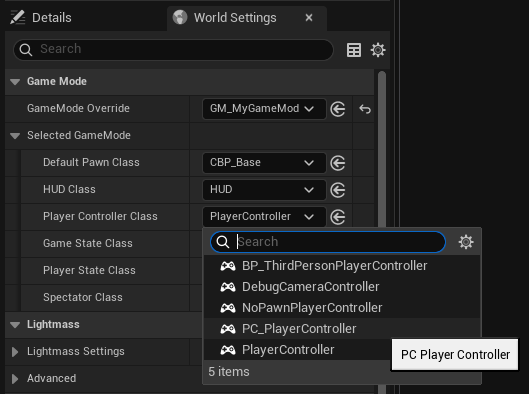
We can set this as the default game mode for our entire project from Project settings…
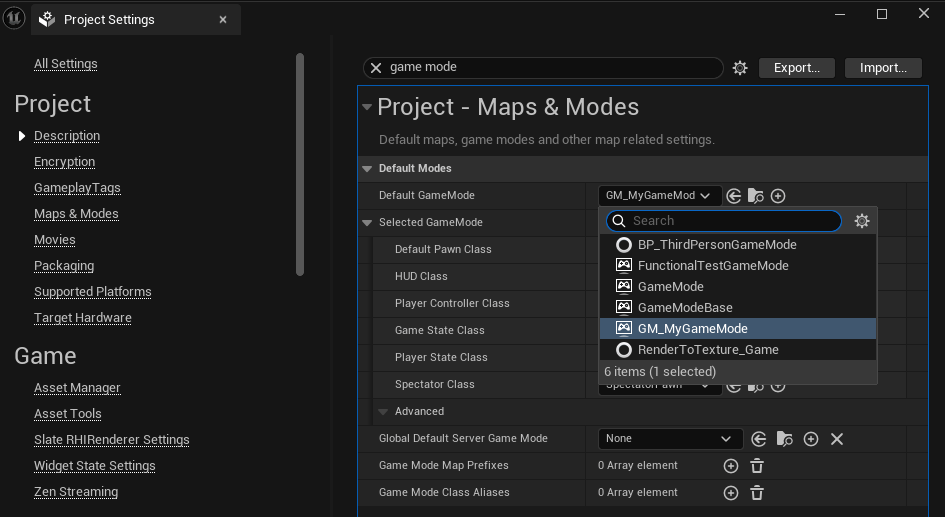
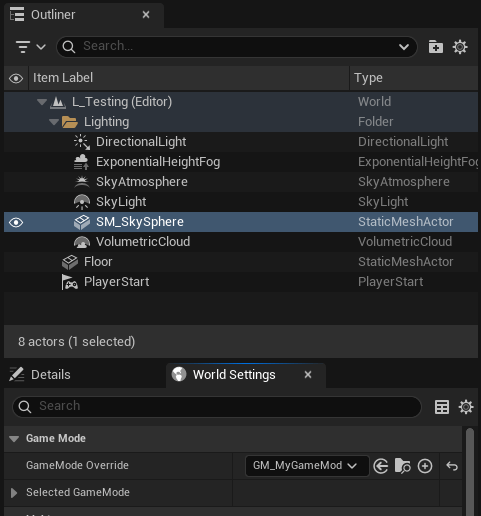
Or we can assign any game mode to a specific level by opening the level, switching to the “World Settings” tab/panel, and selecting our desired game mode from the “GameMode Override” dropdown.
Go ahead and do both now, just so you get a feel for it.
Next, we need to “attach” our character blueprint to the game mode. You can do this two ways, too.
- By opening the game mode in your Content Drawer.
- By expanding the “Selected GameMode” section in your levels “World Settings” panel (shown above).
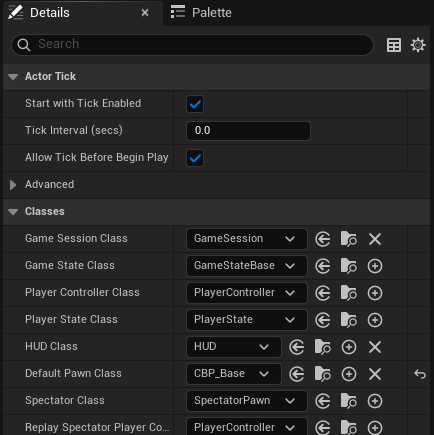
Go ahead and assign CBP_Base to the “Default Pawn Class” of your game mode.
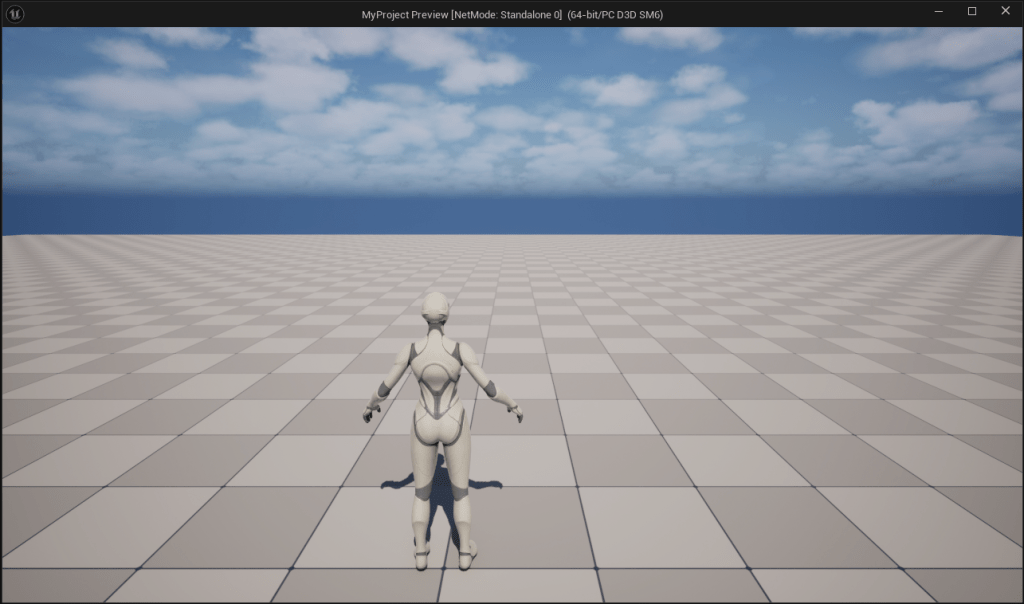
Now if you play the level, you will see from the appropriate camera!
So now our character is IN the level (Yay!) but we can’t actually control it yet or make it do anything. We’ll do the animations last, so let’s get our controls set up next!
💡Don’t forget to hit Compile + Save All regularly. Now is a good time to do it!
Step 3 – Handling Inputs
Controlling our character involves doing two things:
- Handling inputs (e.g. from a keyboard/mouse or gamepad)
- Having those inputs do things with our character.
Let’s talk best-practices. We generally want to handle behavior like movement either in the character class itself or, to make it more reusable, in an Actor Component that we simply attach to our character.
When it comes to the inputs themselves, we need to make some decisions. For this tutorial, we are assuming that our game only has humanoid player characters doing humanoid things. Our approach would be very different if we had things like mounts, vehicles, or other pawns that we wanted to switch between (in those cases, having inputs on components or pawns is potentially the better choice).
But since we just want a working character that is easy to troubleshoot, debug, and maintain, we don’t want different input events spread through a bunch of different components or blueprints, which would force us to hunt them down when something inevitably goes wrong.
Thankfully, for this situation Unreal Engine provides a special blueprint for inputs called a Player Controller. You may have noticed that “Player Controller Class” is one the things that your Game Mode handles…
So the way we’ll build this is by:
- Creating an actor component that handles all our character movement, but doesn’t directly handle input events.
- Add our input events to a new Player Controller blueprint, and those will find and call our movement component events.
This keeps all our input events in one easy-to-evaluate place and we break input handling into separate appropriate components. Everything stays tidy and easy to navigate.
Creating Input Actions
Open your Content Drawer and create a new folder: Content/MyGame/Inputs

Inside that folder, right-click and start typing “Input Action”, then select that to create a new one.
We need to create 5 input actions in total. You can use Ctrl + D to duplicate the first one and quickly create all 5. Name them like so…
IA_MoveIA_LookIA_JumpIA_CrouchIA_Sprint
The IA_ prefix means “Input action”
Input Actions are very simple asset types. You just have a few configuration options and that’s it, with the point being “what kind of input do we need for this?” Is it an axis like a gamepad stick or mouse movement would provide, or is it a button click? Etc.
So first we will configure these and then we will then create an “Input Mapping Context” (aka “IMC”) that ties together these basic input types with actual controls (keyboard key presses, etc).
Now, open each Input Action and change the “Value Type” according to the list below.
IA_Move→ “Axis2D (Vector2D)“IA_Look→ “Axis2D (“Vector2D)IA_Jump→ “Digital (bool)“IA_Crouch→ “Digital (bool)“IA_Sprint→ “Digital (bool)“
Axis2D is like moving your mouse around, or the thumbstick on a gamepad.
Digital (bool) is like a simple button press.
Since we can use an IMC to attach multiple keys to any input action (like movement), the above set of inputs keeps things simple. Remember, an input action does not need to correspond to a key press, but an action we want our character to take. The IMC will handle they key presses.
So let’s create an IMC. In the same folder as your Input Actions, right-click and start typing “Input Mapping Context” then add one.
Let’s call this file IMC_ControlBindings

💡Don’t forget to hit Compile + Save All regularly. Now is a good time to do it!
Now open up the new IMC. At the top you will see a section called “Default Input Mappings”.
In that section, you can add one of your IAs and then specify what kind of key presses or controller inputs you want to use to trigger that IA event. In cases like IA_Move that want an Axis2D, you will specify multiple keyboard keys (like WSAD) and then use “Modifiers” for each key to specify the axis it influences. Let’s walk through them.
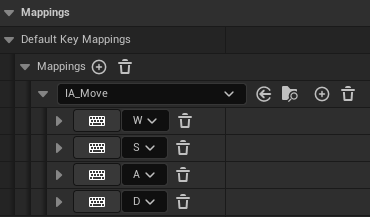
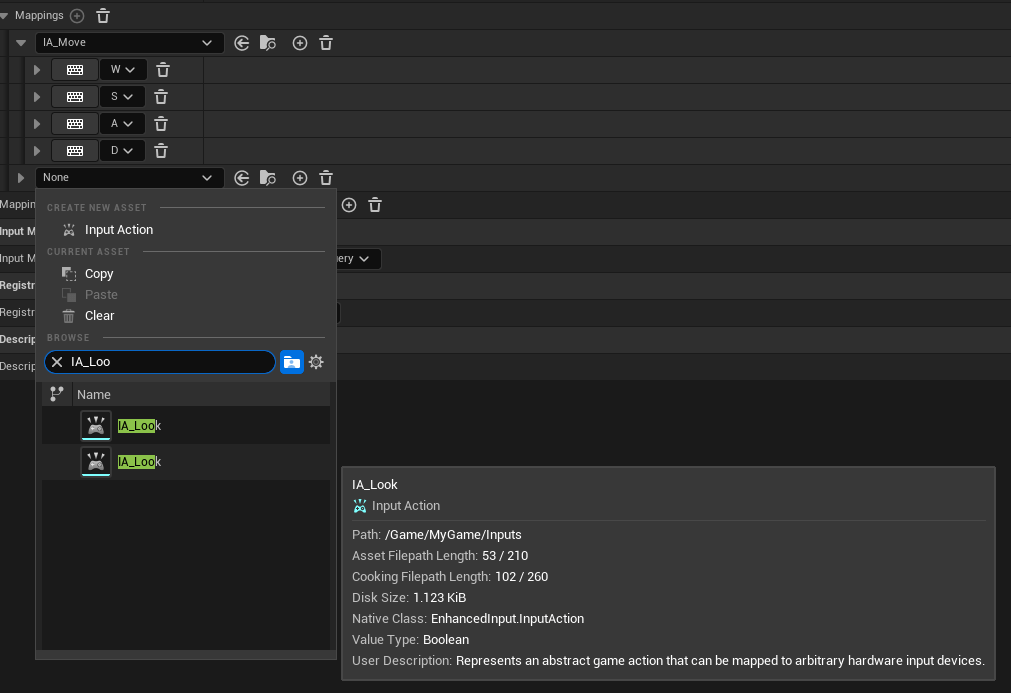
In your IMC, expand “Default Key Mappings” and then click the (+) icon next to Mappings. From here, you can add your first IA. Let’s add IA_Move.
But wait… there are two!? One is from the Third Person content pack we added. You can tell which is the right one by hovering your cursor over each and looking at the full path that pops up.
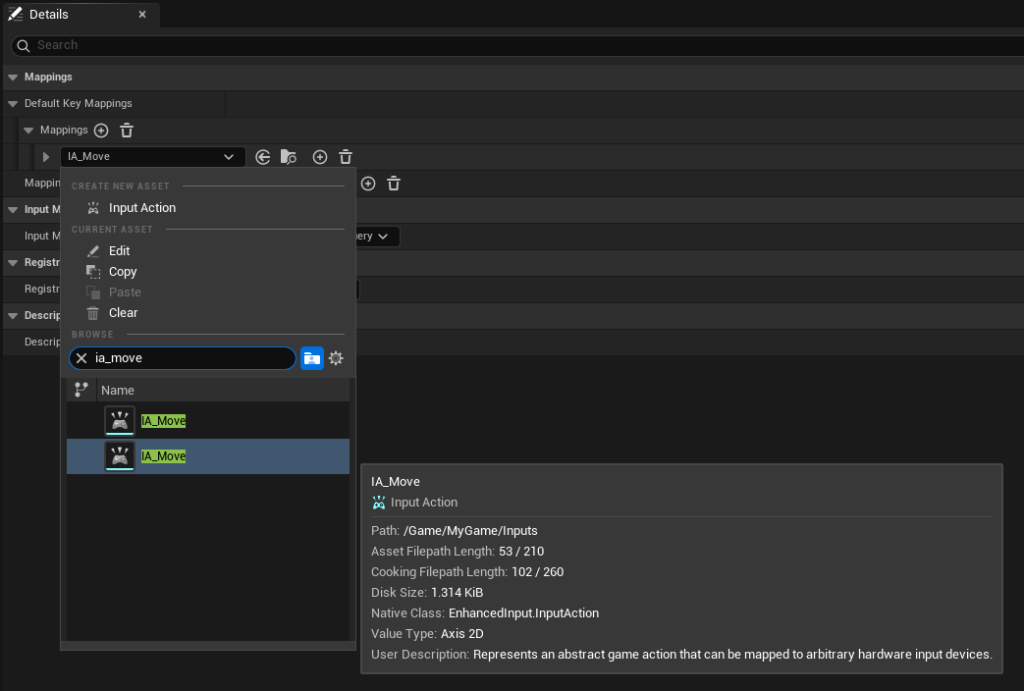
Choose the one you made, as shown above.
Next, click the (+) icon to the right of your IA_Move selection 4 times.
Click the keyboard icon on each entry and then press the key you want to add for that row: W, S, A, D
It should look like this…
Now we need to add some modifiers for each so that the keys correspond to the axis we want each to modify. To do this, we use the “Swizzle” modifier.
Start by expanding the W entry to see more options. Under that, you will see a “Modifiers” section.
A Quick Explanation of Axis2D/Vector2D & Swizzle
This is… a lot. So what does it all actually mean?
Well, it means movement tracks two axes: left/right and forward/back, or X and Y for short.
Both X and Y have values from -1.0 to +1.0, with a default value of 0.
So what we want each key press to mean is…
W→ Y =1.0S→ Y =-1.0D→ X =1.0A→ X =-1.0
Swizzle is a computer graphics term that means “swap these axes” – so by using a “swizzle” modifier, we can specify whether a single key is affecting the X or the Y axis (based on which is listed first). We can also use modifiers to invert values to negative. By combining these two kinds of modifiers, we can make each key affect the axis we want in the direction we want!
Whew. I hope that makes sense. Sorry. I did say it was a lot.
Let’s start with W. Since we want W to mean “go forward” and the w key is one-dimensional (1D), it only counts as “off” or “on” – which translates to either 0 or 1 for only one axis.
But since we have two axes, how do we know what our 1D key press will do!?!?
Right now, it will change the X axis from 0 (the default) to 1 (max) as long as it’s pressed.
How do we know that? Because the order of preference for vectors is X→Y→Z. Since a key press is 1D, it will only affect the first vector in order of preference… which is X by default.
But if you were paying attention above explainer, you probably guessed that this means every single key will currently make us move to the right. That’s not what we want. The D key is fine, but we need modifiers for all of the others to set the correct axis and direction for each.
Let’s start with the W key.
Expand the W row to view more options, including Modifiers.
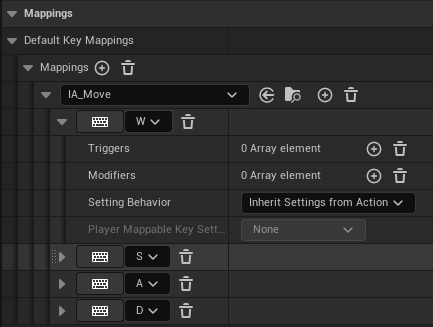
In the Modifiers row, click the (+) icon to add a modifier for that key.
Since we want W to affect the Y axis instead of x we use the “Swizzle Input Axis Values” modifier.
Next, we just need to make sure the order of operations starts with YX, which will ensure our 1-dimensional (1D) key press goes to Y instead of x. That’s it. Now pressing W will set the y axis to +1.0, which we can use to make us go forward!

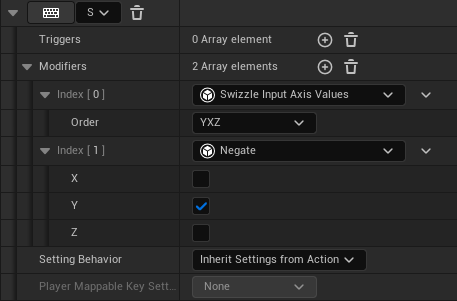
Next, we need to do the exact same thing for the S key. However, we don’t want S to make us move forward so we also have to invert the value so it creates a negative number instead of a positive.
So for the S key, let’s ALSO add a “Negate” modifier. This modifier lets this key invert the value of any checked axis. We only want to invert Y (forward/back) so let’s make sure only Y is checked.
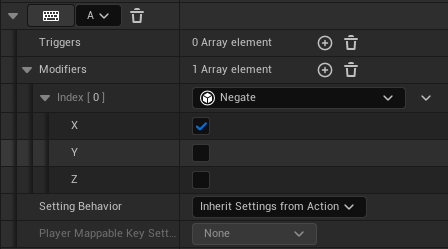
Finally, we just need to tweak the A key, since D will already go “right” with it’s defaults. Expand A like the others, but the only modifier we need here is a “Negate” for the X axis so that we can go left.
💡Don’t forget to hit Compile + Save All regularly. Now is a good time to do it!
The good news is, that was the most difficult input action to configure, and only because you needed to grasp the concept of vectors, the way 1D inputs interact with 2D vectors, swizzles, etc. The rest will be easy.
Add another mapping by clicking the (+) next to “Mappings”.
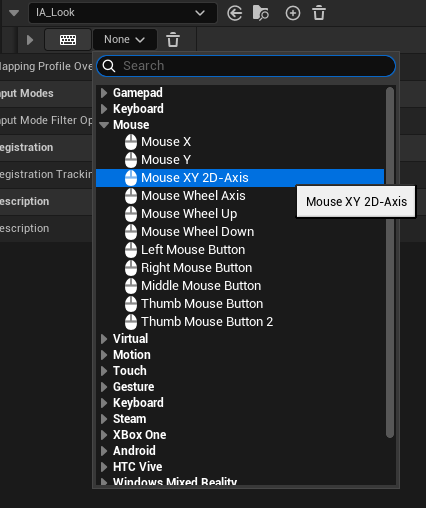
Select the correct IA_Look like you did with IA_Move.
For this mapping, we want to use the mouse to look around. Fortunately, mouse movement is already a Vector2D since it moves across both XY axes. To bind this, click the “None v” dropdown, and then find “Mouse XY 2D-Axis” and select that. Done.
Next, add mappings and key assignments for the rest of the Input Actions the same way:
IA_Jump→ Space barIA_Crouch→ Ctrl KeyIA_Sprint→ Left Shift Key
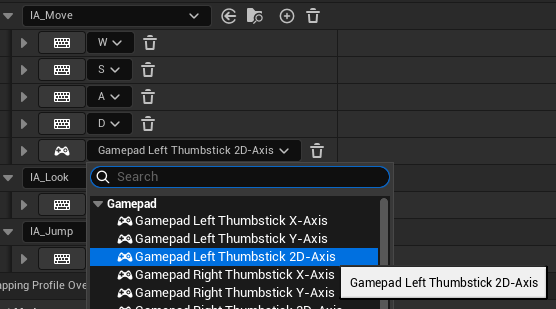
If you have a gamepad and are feeling emboldened, try adding mappings for that, too. You can also use your gamepad inputs the same way as keyboard presses to assign the mappings, which is much easier than finding the appropriate input from the dropdown list. Just beware thumbstick axes – you usually have to change a single axis to a 2D axis manually!
💡Don’t forget to hit Compile + Save All regularly. Now is a good time to do it!
Step 4 – Locomotion Component & Player Controller
In this part of the tutorial, we will need to bounce between two new blueprints: an actor component blueprint that handles our character’s locomotion, and a player controller blueprint that reads our inputs and sends them to our actor component.
The reason we will use an “Actor Component” (AC) instead of putting the locomotion/movement logic directly on the character is because ACs can be attached to any actor. This will give us the ability to attach this component to anything we want to control and reuse this functionality whenever we want, rather than having to manually copy code around. Modularity and reusability is the goal.
First, let’s add a new Player Controller blueprint to our Content/MyGame/ folder.
In that folder, right-click and create a new Blueprint Class. Make this one of the type “Player Controller”.
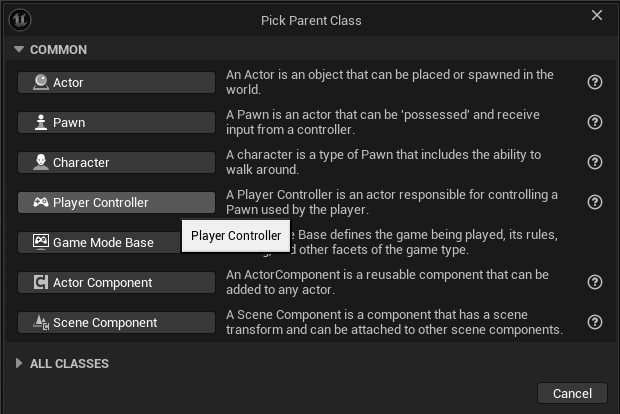
Let’s call it PC_PlayerController
Next, let’s create a new folder: Content/MyGame/ModularComponents/
In that folder, right-click and create a new Blueprint Class. Make this one of the type “Actor Component” (AC).
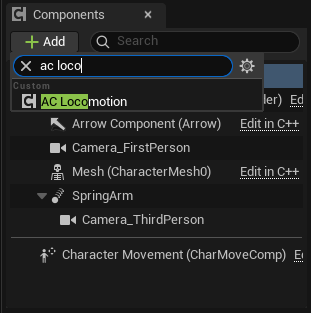
Name the new component AC_Locomotion
Here’s what we need to do now:
- We need to use the Player Controller to tell Unreal Engine about our IMC.
- We need to use our AC to create events and handle some movement.
- We then need to use the Player Controller to capture our inputs and route them to the appropriate AC events.
The Player Controller – Initial Setup
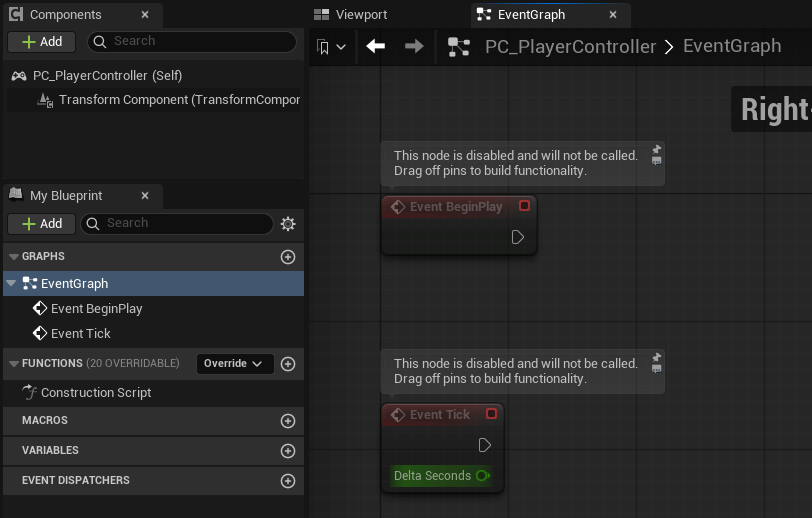
To start, open your PC_PlayerController and select the “EventGraph” in the left panel. This is where we will start editing our blueprint.
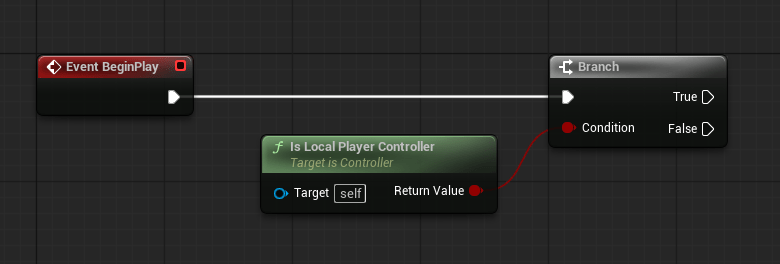
First of all, this class will apply to all players if playing multiplayer, so adds a bit of logic to ensure we only register the IMC for the local player… the one who is supposed to control this particular character.
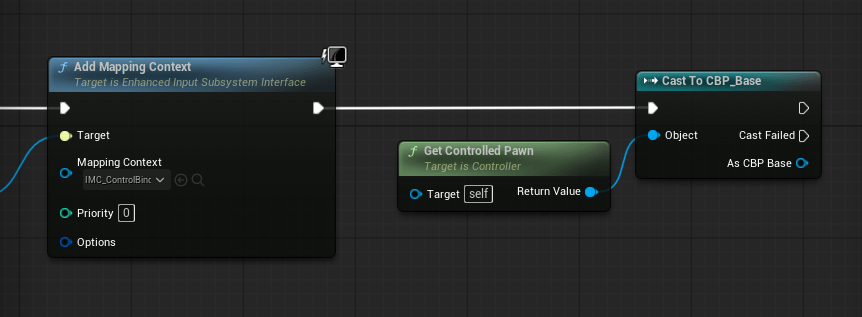
On Event BeginPlay drag off a branch.
For the branch condition, add the “Is Local Player Controller” node.
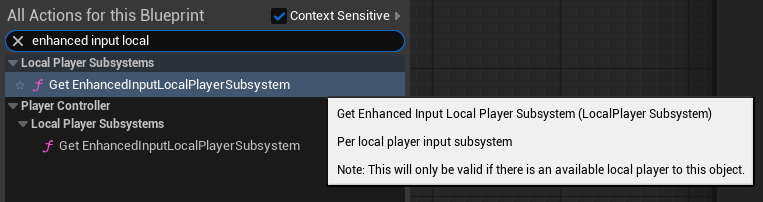
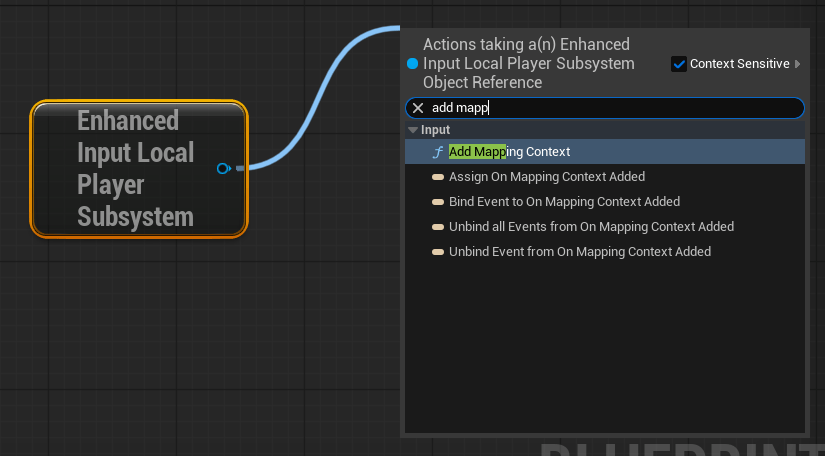
To the right of your Branch, right-click to add a new node and search for “enhanced input local” – this will narrow down the results. Now select “Get EnhancedInputLocalPlayerSubsystem” to add that node.
Drag off the blue pin and search for “Add Mapping Context”
Next, connect the “Add Mapping Context” node to the Branch’s True output, like so…
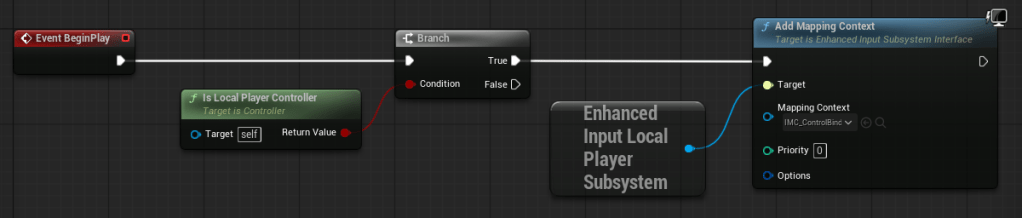
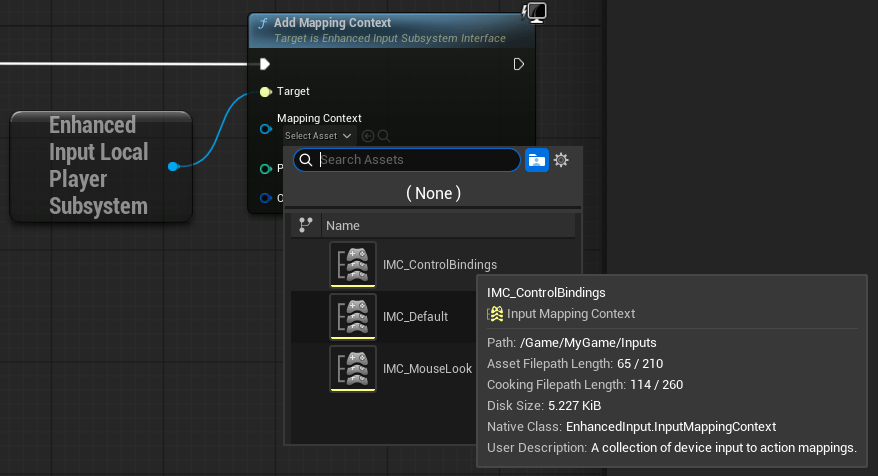
Finally, we just need to tell the “Add Mapping Context” node about our IMC_ControlBindings, by selecting it in the “Mapping Context” dropdown.
Before we move on to the AC, let’s tell our GameMode to use this fancy new PlayerController we’re building… just so we don’t forget. You remember how to do that, right? Scroll up a bit if you need a refresher.
AC_Locomotion – Initial Setup
Now let’s open up our AC_Locomotion blueprint. It’s time to make our character move!
Here’s a couple handy tips before we start…
- You can press the keyboard shortcut Ctrl + P to quickly search for and open any file/asset in your project. No need to click around your Content Drawer to find AC_Locomotion… if you remember part of the name, this will get you there faster!
- You can add multiple “Graphs” to any blueprint. You aren’t limited to just the original EventGraph. We can use this to better organize things.
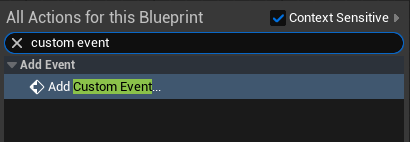
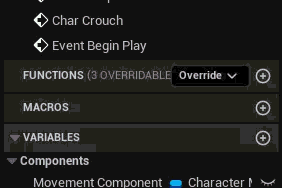
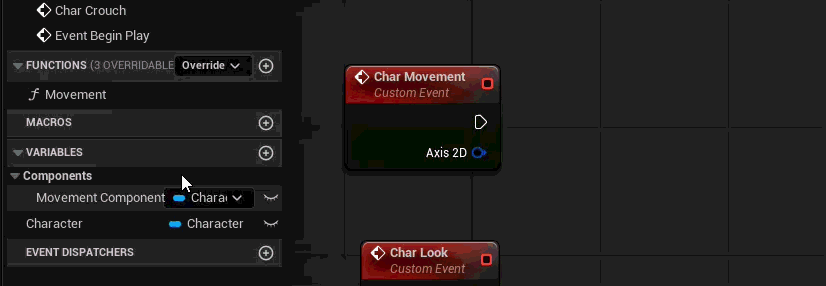
Under the EventGraph, right-click anywhere on the grid and search for “Custom Event” then add it.
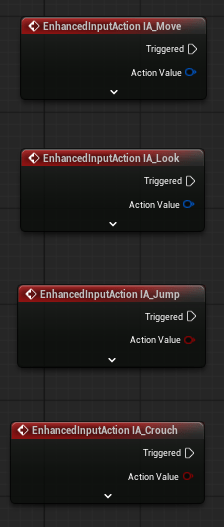
Go ahead and create 4 custom events:
Char MovementChar LookChar JumpChar Crouch
We’re going to skip sprint for now, and add it at the end of all this since it functions like a modifier to another input (movement).
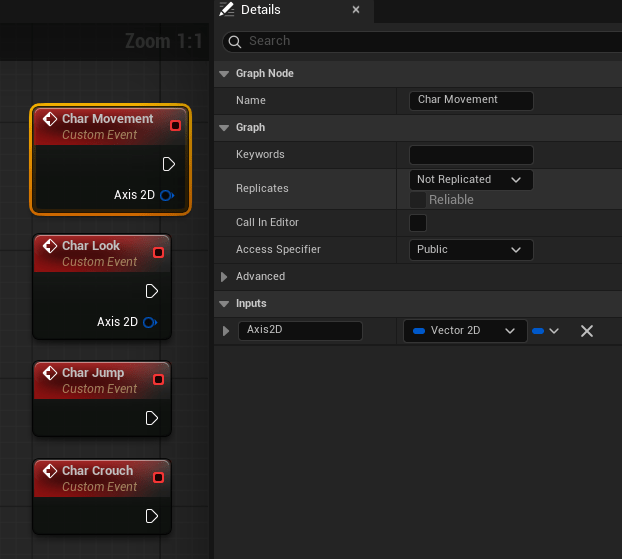
There is one more step, though. Both our “Char Movement” and “Char Look” events need Vector2D inputs in order to handle the movement axes we configured earlier.
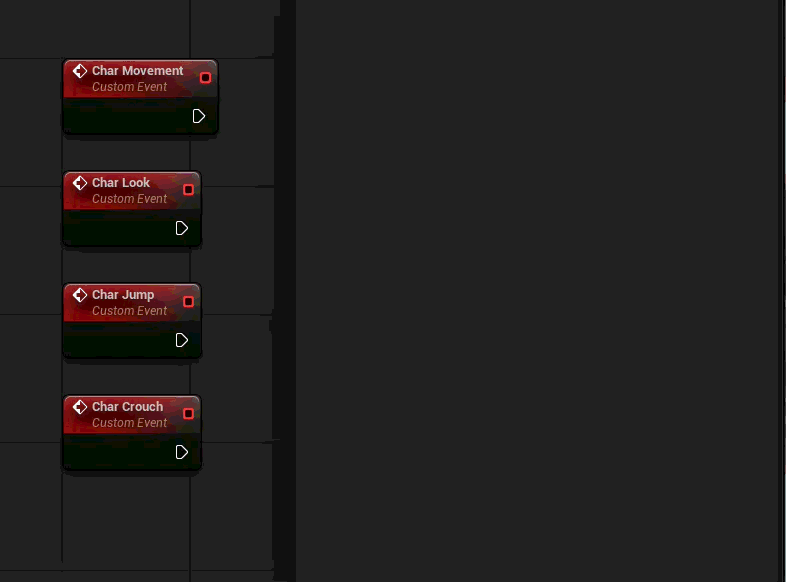
You should now have this…
💡Don’t forget to hit Compile + Save All regularly. Now is a good time to do it!
Finally, let’s add this actor component to our character, CBP_Base, before we forget to make that connection!
Player Controller – Adding Input Actions
Let’s switch back to our Player Controller. Here’s what we want to do next:
- Register our Input Actions
- Check the pawn for our Locomotion component
- If present, use the Input Actions to trigger the custom actions we created in the Locomotion component
There are a lot of ways to add our IAs to the Player Controller blueprint graph:
- Drag them in from your content drawer.
- Right-click and start typing, e.g.
IA_Move– just be aware of the duplicates from the third person content pack and make sure you are selecting YOURS.
Whichever you choose, add them to your graph like so…
Player Controller – Talking to Other Blueprints
Things will get a little more complicated here, because we want to be able to talk to other parts of our game from our Player Controller blueprint. This involves getting some references and storing them in variables for easy re-use. We will also want to create some functions so we aren’t repeating ourselves for basic things like verifying the Locomotion component was found.
Inside the controller, we can get the “controlled pawn” by using the “Get Controlled Pawn” node at any time. This isn’t automatically compatible with Characters, however, since characters are built on top of Pawns.
Let’s start by expanding our Event BeginPlay logic. After your “Add Mapping Context” node, right click anywhere and add the “Get Controlled Pawn” node. Then create a wire from that Return Value and choose “Case to CBP_Base” (that’s the character class we created).
Let’s save that as a variable. Right click on “As CBP Base” and choose “Promote to Variable”. Let’s call the variable “CBP_Base”. We should also start commenting things to make it easier to read.

Now that we have a reference to CBP_Base, we can get a reference to our AC_Locomotion component inside it… like so.
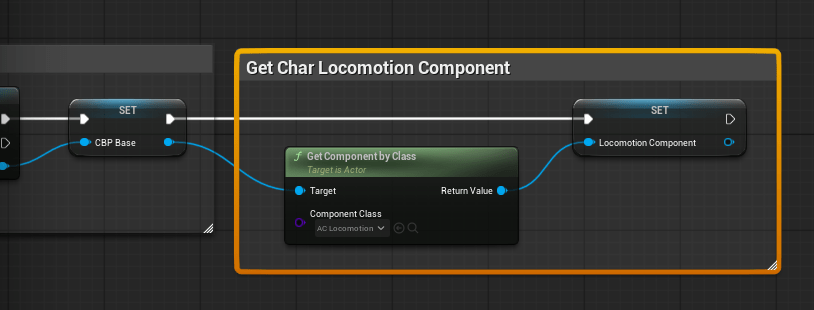
Above, we use the “Get Component by Class” function, called on CBP_Base, and tell it to find the “AC_Locomotion” class. Then we promote it to a variable named “Locomotion Component”.
That’s all we need to start connecting the Player Controller to the Locomotion Component events.
💡Don’t forget to hit Compile + Save All regularly. Now is a good time to do it!
Let’s start by connecting our movement!
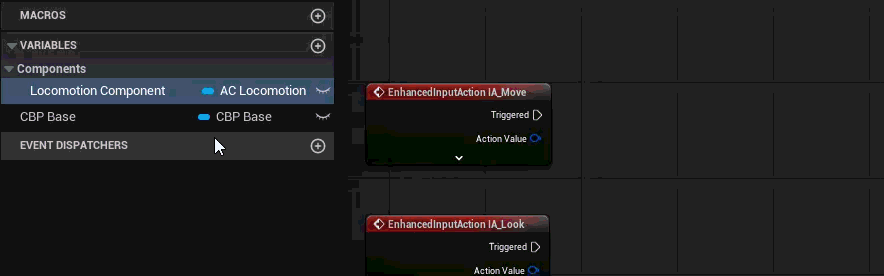
First, let’s get a reference to our Locomotion Component. You can either drag it out of the left panel under “Variables” or you can right-click and search for it.
Next, drag off the pin and select the “Char Movement” event we created earlier.
Now, simply connect your IA_Move’s “Triggered” pin to your Char Movement and then connect IA_Move’s “Action Value” to your “Char Movement” “Axis 2D”, as shown below.
Now hook up all the others the same way. Since Jump and Crouch don’t need any axis inputs you simply need to call them. When done, you should have something like this…
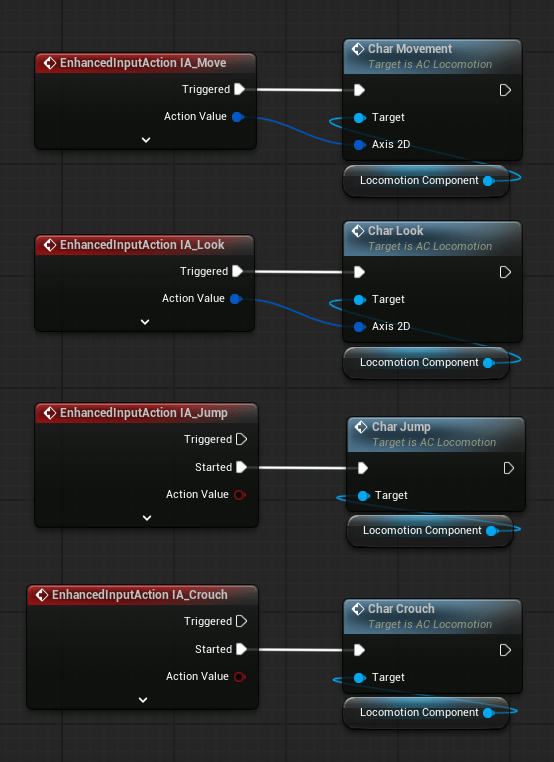
A Quick Explanation of Triggered vs Started
The “Triggered” execution pin will execute continuously while that key is pressed. That’s good for movement, not so good for jumping or crouching.
So for actions that we want to happen ONLY ONCE when a key is pressed, we use the “Started” execution pin, instead!
And that’s it. We’re done with our Player Controller. But now that we are sending inputs to our actor component, we still need to make the inputs do things with our character. So let’s work on making our character move. Finally!
💡Don’t forget to hit Compile + Save All regularly. Now is a good time to do it!
AC_Locomotion – Making Our Character Move
Let’s make our character move! Open up AC_Locomotion.
Before we get started, let’s get some more conceptual stuff out of the way…
A Quick Explanation of Movement
Character blueprints come with a “Character Movement Component” (or CMC, for short) built-in. This is the component you need to interact with to make your character move around. You could do something entirely custom, of course, but why?
The CMC includes simple ways to move, jump, crouch, and more – sparing you, the developer, from having to do all that math yourself.
Like we just did in our Player Controller, we need to first get a reference to the CMC and store it as a variable.
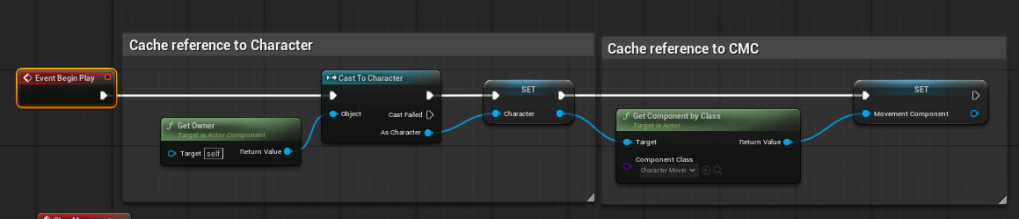
So near the “Event BeginPlay” event, right click and add a “Get Owner” node. Next, pull off the “Return Value” pin and create a “Cast to Character” node.
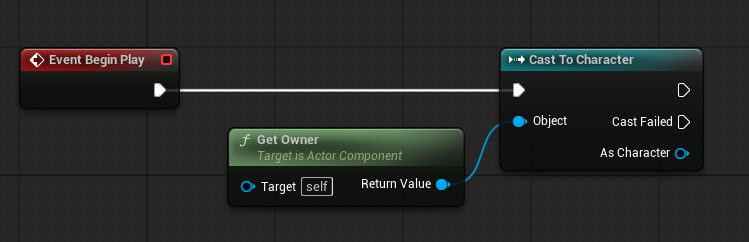
Sidenote: When you need to use "Cast to", make sure you are doing it somewhere like "Begin Play" or "Construction Script". While it's necessary and light-weight, it can be very heavy if you do it too much in places where the code is constantly being executed!
Like we did earlier, let’s promote “As Character” to a variable, and name the variable “Character”.
Pull off the blue pin and – just like we did earlier – add a “Get Component by Class” node. This time, however, we want to select “Character Movement Component” from the drop-down.
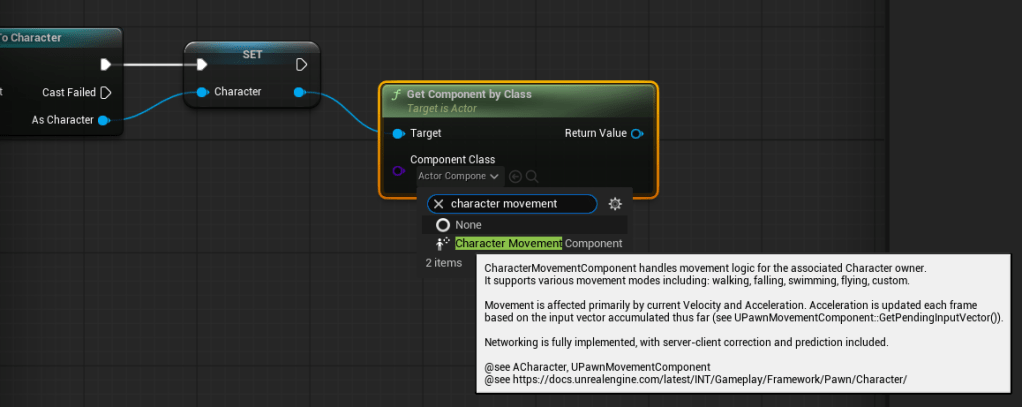
Right-click on the Return Value and choose “Promote to Variable” again so that we can save this to a reusable variable. Call the variable “Movement Component”. Also make sure to connect your execution nodes, like so.
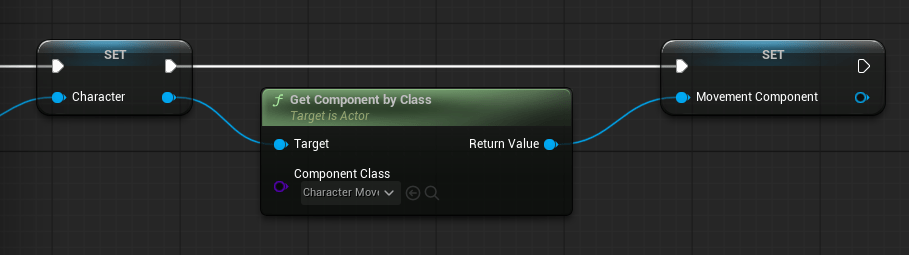
And let’s add comments to keep it tidy.
Now that we have our references, we can use those references to interact with the character the CMC! So let’s start sending commands to the Character Movement Component!
Let’s create a new function in this blueprint, and call it “Movement“
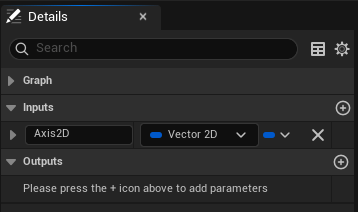
We want this function to have one input, a Vector 2D. Like so…
Let’s go back to the EventGraph for a second and hook it up, then come back to the function (you can just double-click on it’s node), where there is more to do.
Inside your Movement function, right-click on the “Axis 2D” input pin and select “Split Struct Pin”. This will let us access the X and Y axes separately.
Next, pull in the Character variable. The Character class has helper functions that will interact with the CMC for us. We only need to interact with the CMC to modify it’s stock behavior, which we will do later when we implement “Sprint”.
Pull off from the Character variables pin and add a “Get Control Rotation” node. This node gets the vectors for the direction the character is currently facing (remember that arrow widget?).
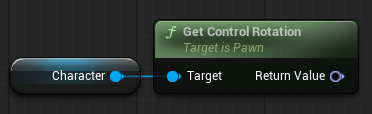
Next, pull of that Return Value and add a “Get Right Vector” node. This is literally just the direction of our character’s “right side”.
Next, add another instance of “Character”, pull off it’s pin, and add a “Add Movement Input” node.
You should have something like this…
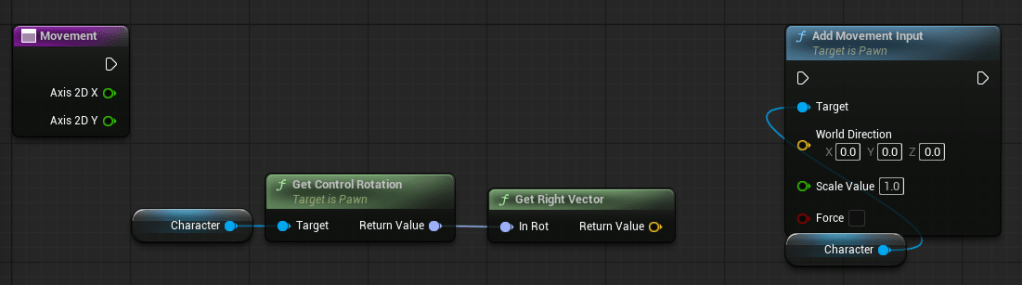
Now, connect “Get Right Vector” to your “Add Movement Input” “World Direction” pin…
Then connect the execution pins…
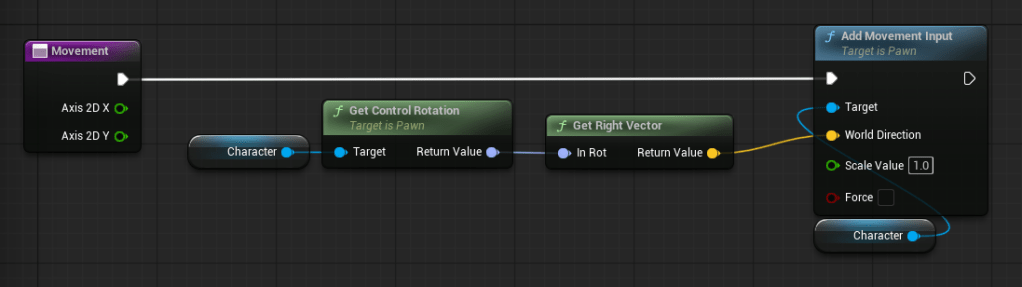
And finally, connect the “Axis 2D X” to “Scale Value” – this is the -1.0 to +1.0 value we configured for the X axis, or left/right movement.
And don’t forget to comment it!
💡Don’t forget to hit Compile + Save All regularly. Now is a good time to do it!
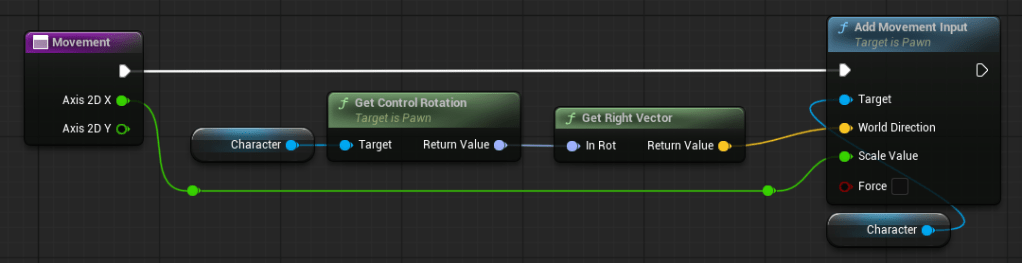
Now, if you do a test-play, your character should be able to move left and right!

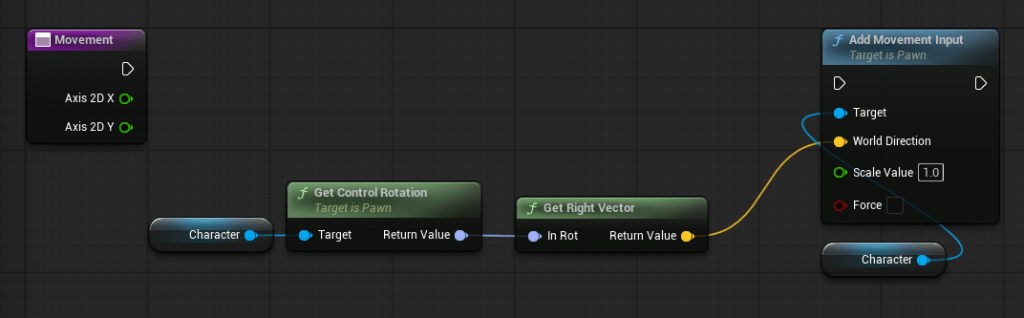
Next, we just need to make the character go forward/backward!
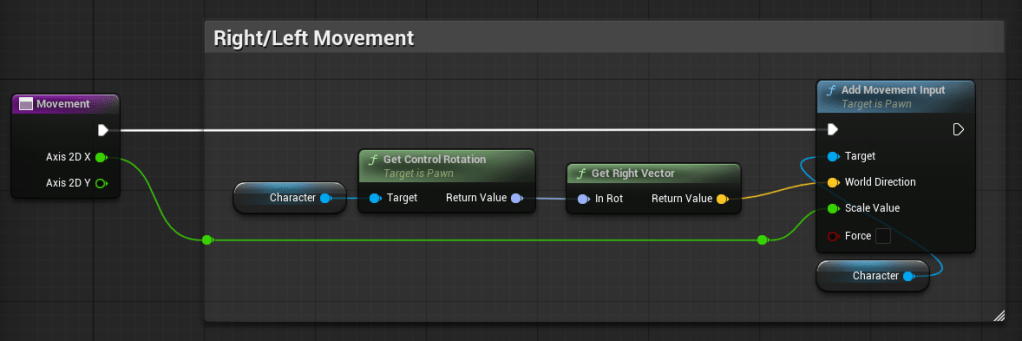
Duplicate (or copy/paste) your entire comment block beneath the first one. Rename the comment “Forward/Back Movement”.
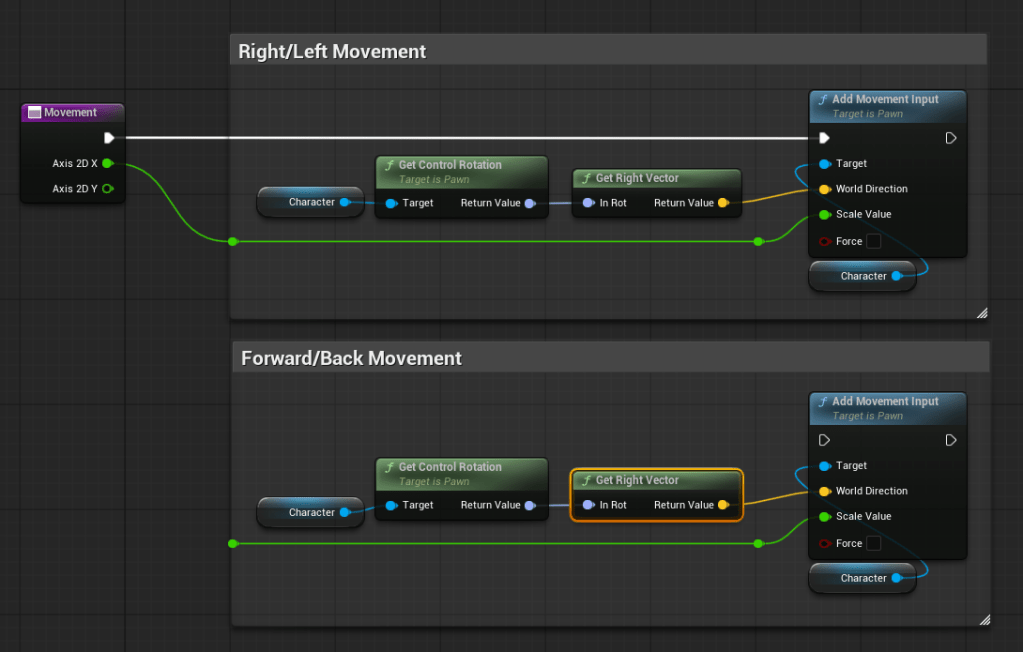
Next, DELETE the “Get Right Vector” node and replace it with “Get Forward Vector”. This is the Y axis that will let us move forward/backward.
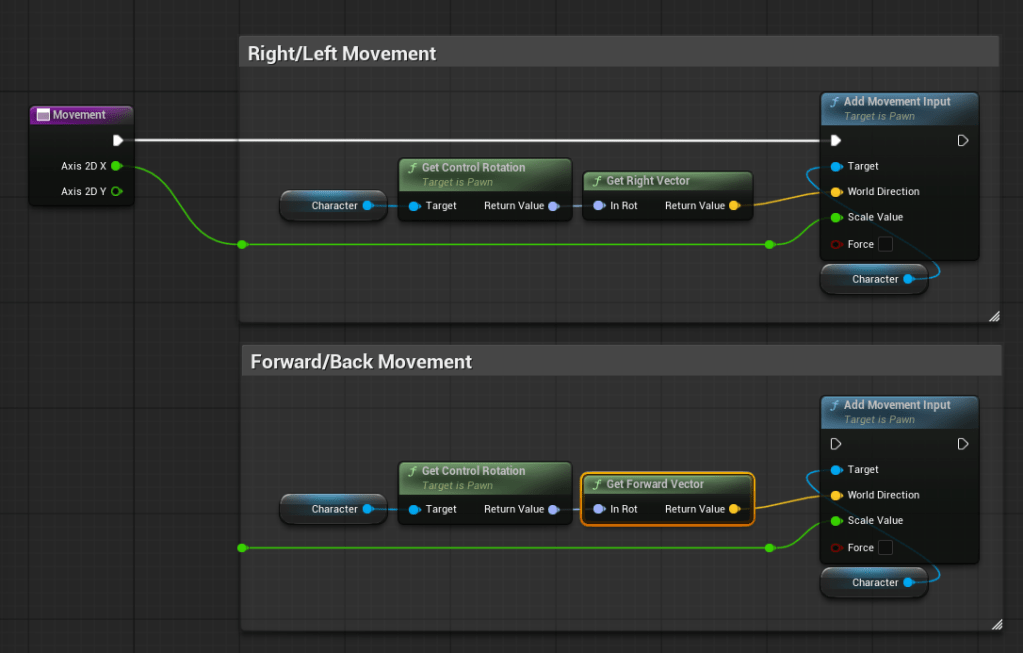
Finally, we just have to connect the execution wire…
And connect the “Axis 2D Y” wire…
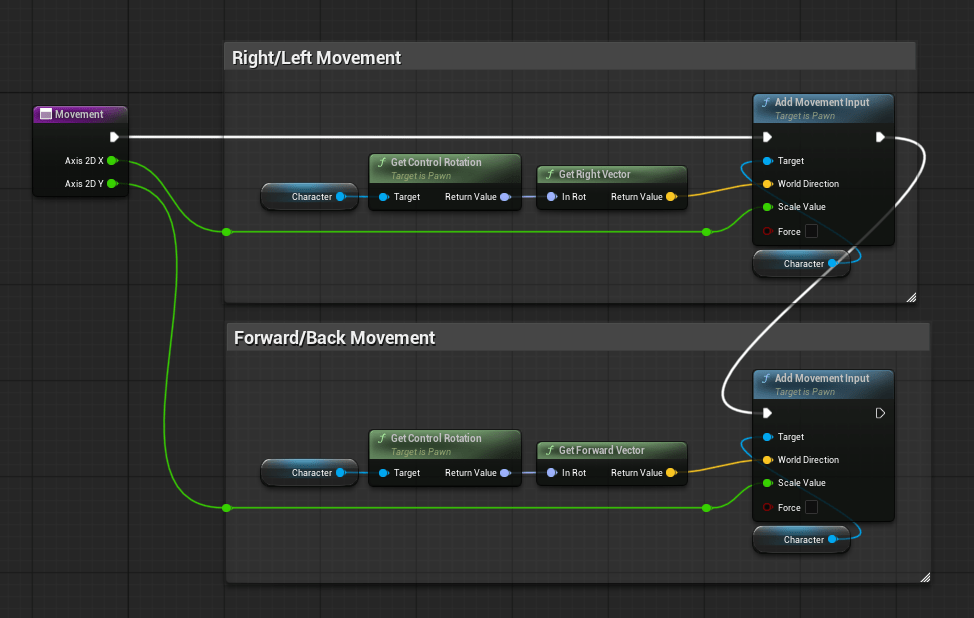
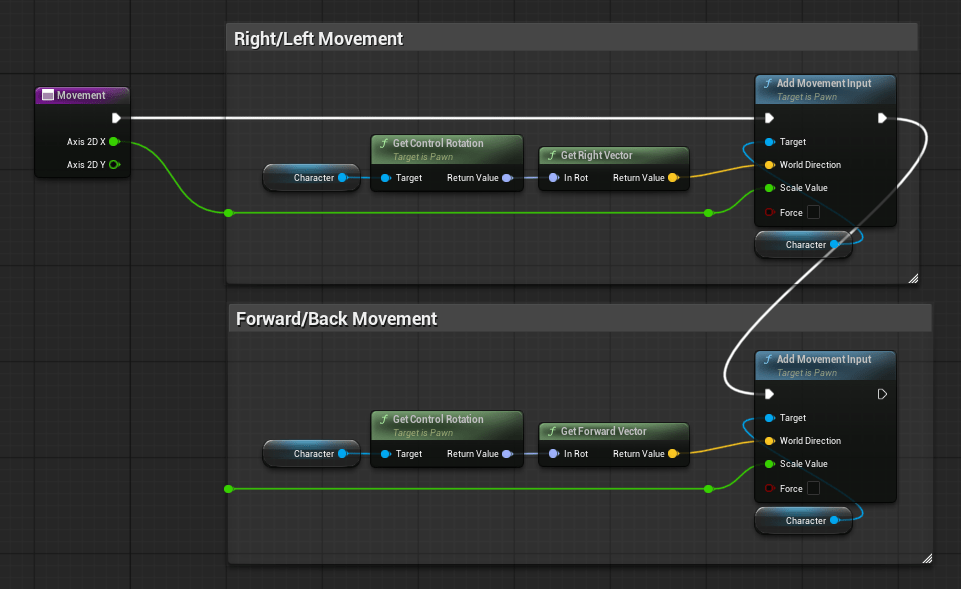
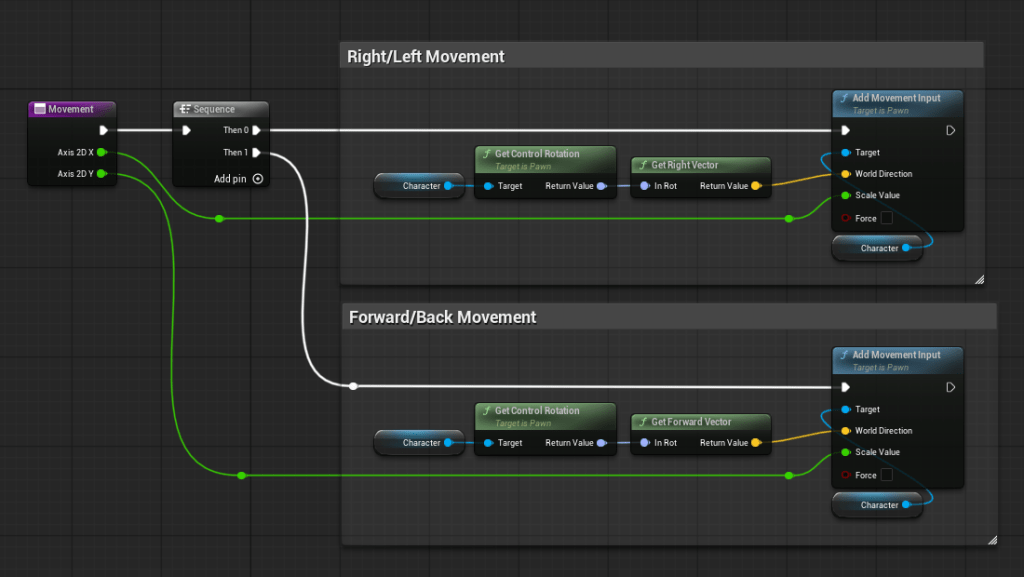
If the way the above blueprint is organized is bothersome, you could use a sequence node to route your execution wires instead. The choice is yours!
💡Don’t forget to hit Compile + Save All regularly. Now is a good time to do it!
Now, if you test-play you will find that your character can move around in all directions! Feels good, right?
AC_Locomotion – Connecting the Rest of the Movement Features
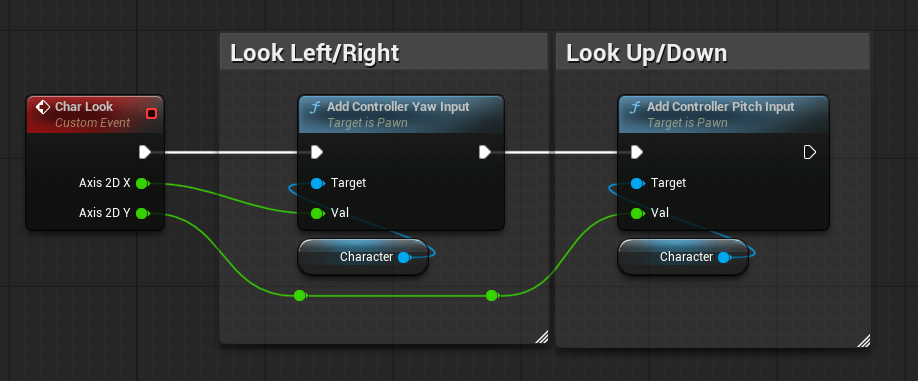
Setting up “Char Look” is very similar to the movement, but even more simple. You are using the Character class’s “Add Controller Yaw Input” node and “Add Controller Pitch Input Node” respectively.
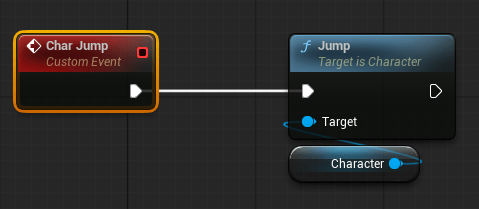
And your Char Jump should look like this…
And your crouch should look like this…
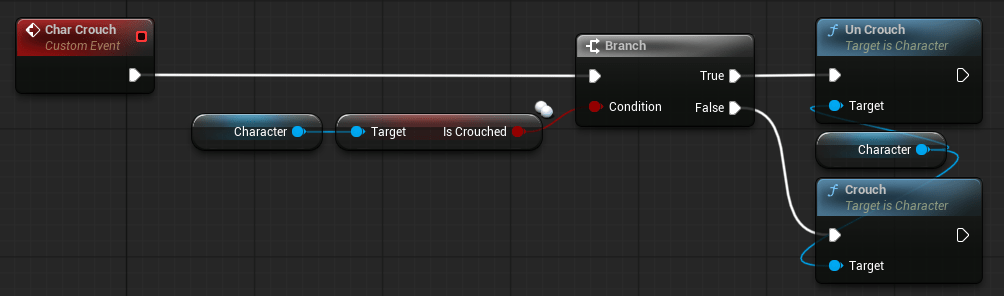
The way we’ve done crouch here is a “toggle”, so that we can show off the “Is Crouched” variable. When you call “Jump” or “Crouch” or “Un Crouch” the CMC does the work for you under the hood.
At this point, if you play, you will notice that two things aren’t working yet. That’s because we have to change a couple configurations in our Character Blueprint.
CBP_Base – Enable Crouch and Camera Movement Settings
Open CBP_Base.
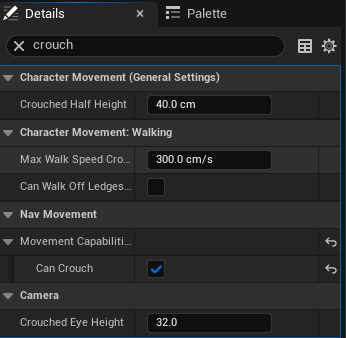
First, let’s fix crouching by enabling it. That’s right, crouching is NOT automatically enabled by default!
Under the Details panel, search for “crouch” and make sure “Can Crouch” is checked.
Next, select your SpringArm and search for “Camera Settings” and make sure the option “Use Pawn Control Rotation” is checked.
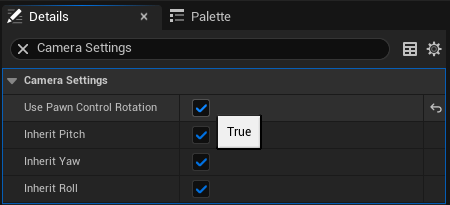
Do this again for your Camera_FirstPerson, too.
Play in the editor and see how it feels! If you don’t like the vertical mouse look, you can open your IMC_ControlBindings file and add a “Negate Y” modifier to your IA_Look binding, which will flip the vertical (aka Y) axis. Like so…

We’re almost there. Now all we need to do is add the animations to complete the illusion!
💡Don’t forget to hit Compile + Save All regularly. Now is a good time to do it!
Step 5 – Character Animations
Remember how we loaded the Third Person Content Pack? That pack includes a pre-made animation blueprint that supports walking/running, idle/standing, and jumping. If you want to see it just for giggles, do this…
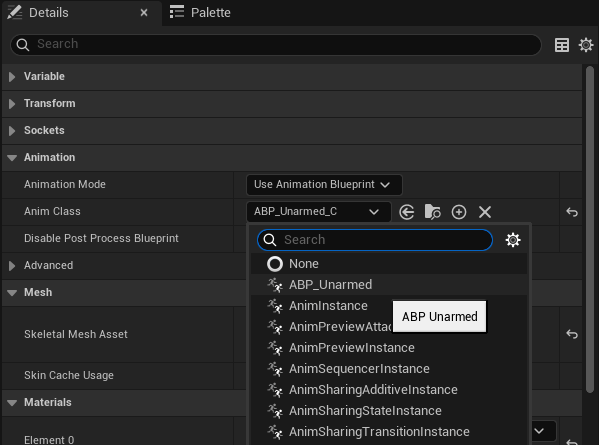
In your CBP_Base blueprint, select your Mesh from the Components panel (far left).
In the Details panel (far right), find the “Anim Class” setting and select “ABP_Unarmed” from the drop-down.
If your Viewport is open, you should see your skeletal mesh “snap” into an idle animation loop. Play in editor and give it a try!
You’ll notice we don’t have any crouching animations, though. The capsule shrinks like we’re crouching, but our mesh doesn’t animate like it’s crouching. The next tutorial will dive into animations. Stay tuned!
